-Sponsored Post-
Making special things for a living is such a joy, especially when I have the opportunity to make (and show YOU how to make) something like this. My extremely talented florist Jacki is an out-of-the-box thinker who loves creating unique things and is sharing some of her most valued tips and tricks with us here. Today we’re making “wearable” wedding flowers and they are stunning. These three ideas will take your wedding look to the next level for sure. The designs only look this good because we ordered all of the flowers from FiftyFlowers.com and they wonderfully arrived on our doorstep, ready to craft.
Flowers, Delivered To Your Door
Now that I’m a mom, early mornings are a daily occurrence. However, I have absolutely no interest in getting up even earlier to drive downtown LA to the flower mart to buy my flowers. While that is an option for me, it might not be an option for you. So where can you get wholesale flowers? Easy, from FiftyFlowers.com and the best part is that they deliver them to your door. They will also help you with the ordering process, the rehydration process, and anything else you could possibly need help with; their customer service might be better than Nordstrom.
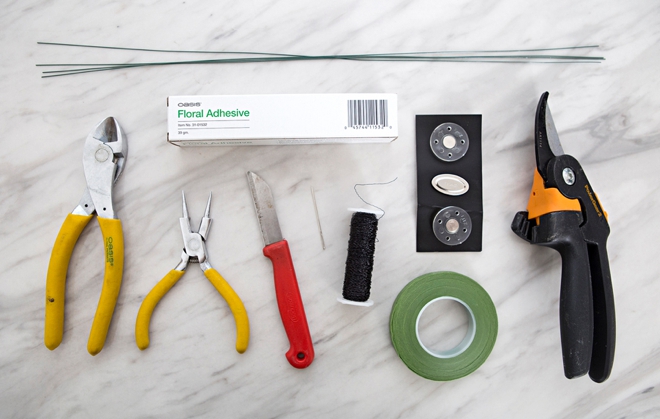
SUPPLIES:
- Magnetic Floral Pins
- Floral Adhesive
- 26 Gauge Floral Wire
- Bullion Wire
- Embroidery Needle
- Wire Cutters/Knife
- Round Nose Pliers
- Pruning Shears
- Floral Tape
All of the designs are attached to the dresses using magnets, it’s awesome! Test your magnets! Some we received were super strong like they are meant to be and some weren’t!
FLOWERS: (from the left)

Since FiftyFlowers is a farm to customer, wholesale flower company, it means that your flowers are shipped straight to you from the farm and they will arrive in large cardboard boxes…
- Using hardware store buckets, fill them up 1/4 of the way with water, make sure they are clean to start with.
- Carefully unbox and un-package your flowers, per the instructions from FiftyFlowers.
- Each flower is different and their team can walk you through the prep for each flower if needed.
- It is 100% normal for your flowers to look a bit tired and lifeless, they’ve been on a long journey to you.
- Give each stem a fresh diagonal cut and place in the water to rehydrate for 4-12 hours.
- Keep out of the heat and sun while rehydrating.
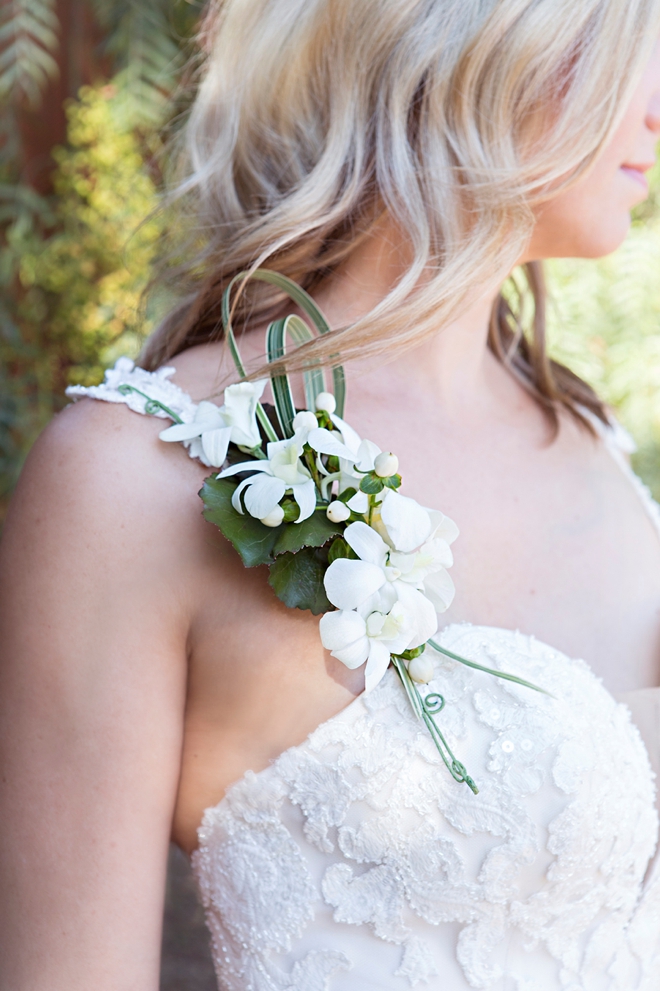
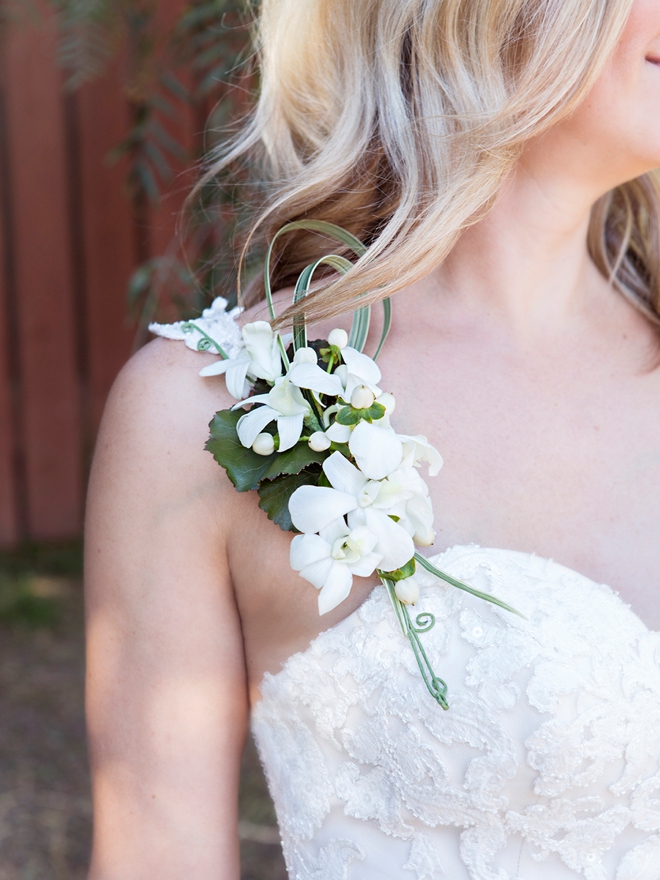
The Shoulder Corsage
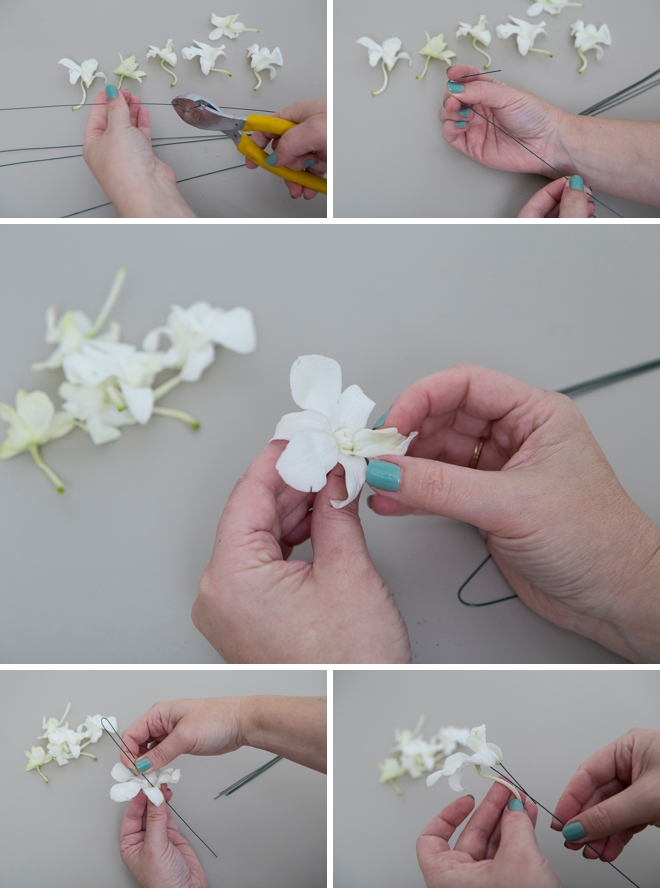
Wiring. Start by removing 8-10 orchid blooms from their stems. Now we’re going to wire them. Cut 18″ of 26 gauge floral wire in half, then bend about 2″ around your thumb to create a hook. Pull the lip of the orchid back and hold it with your other hand, to reveal the middle of the orchid. Then insert the wire through the middle and pull all the way down, being careful not to pull the wire through. The little hook will hold onto the petal for stability.
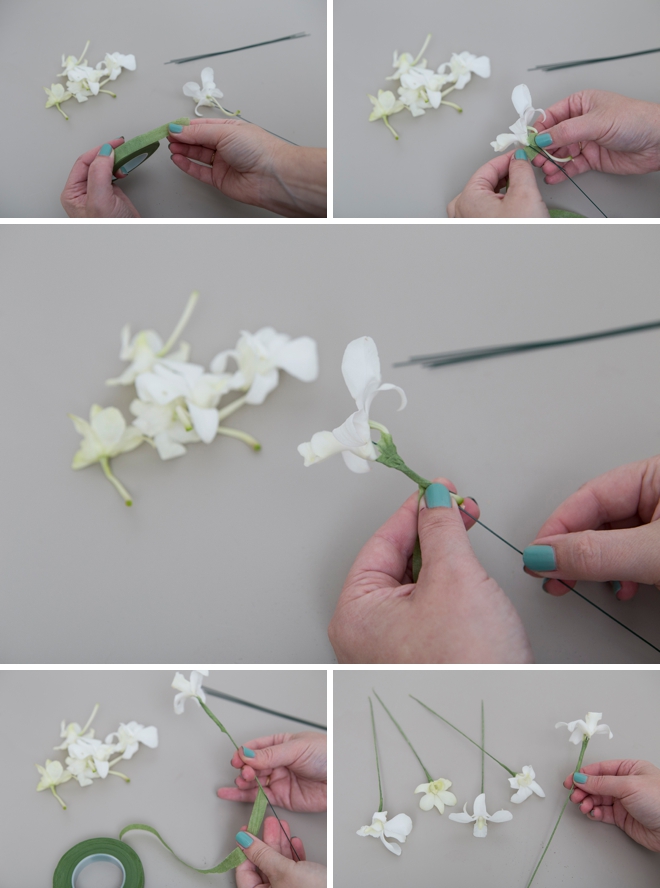
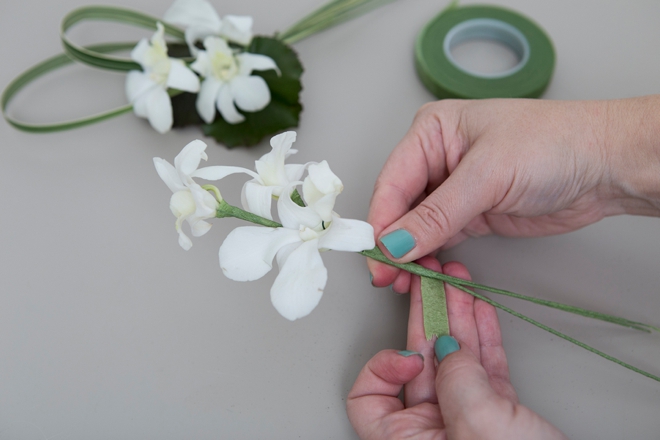
Floral tape only becomes sticky when pulled! Apply floral tape around the wire starting at the base of the flower and wrap down. Keep rolling and wrapping the tape until you reach the end of the wire then simply rip the tape and press it into itself to finish. Now make at least 6 wired orchid petals.
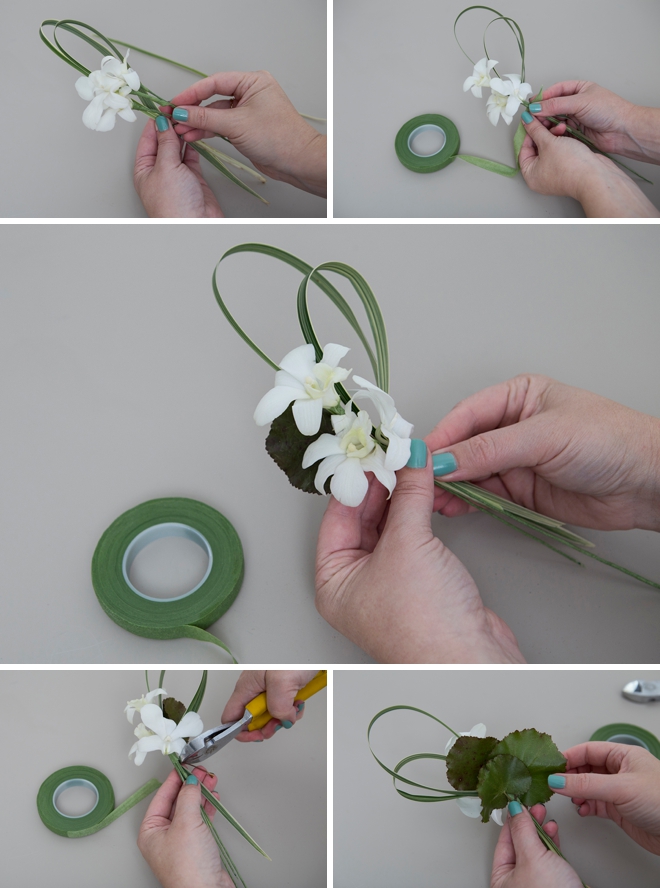
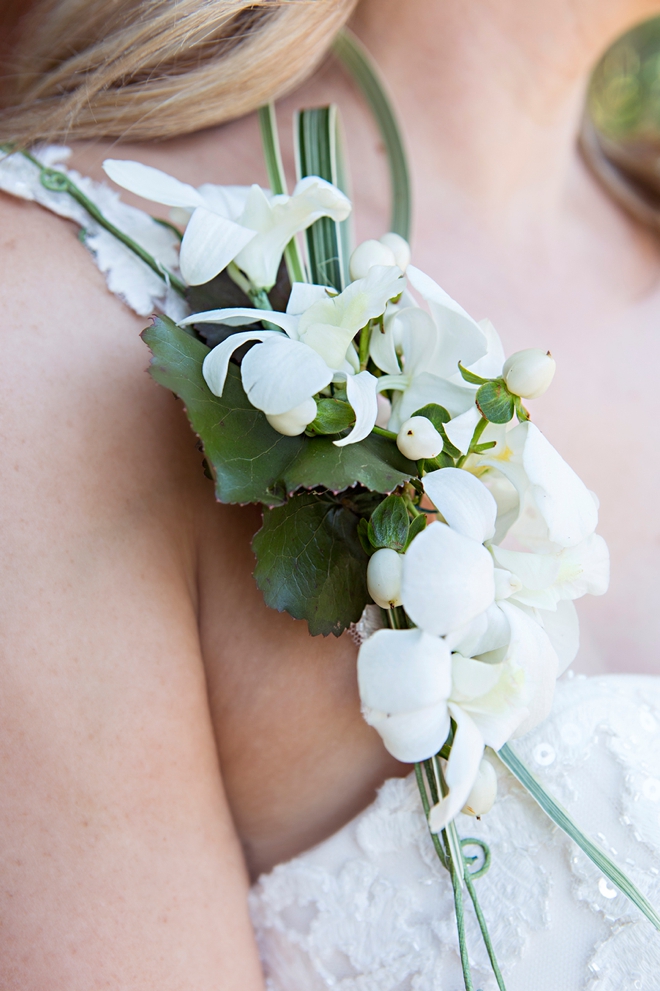
Start assembling the corsage. Place three wired orchid petals together along with two pieces of folded Lily grass. Then add 2-3 Galax leaves and once you’re happy with the arrangement, tape them all together. Cut off the Galax stems but leave the grass ends and the wired ends.
Next, combine 3 more wired orchid petals and tape them together.
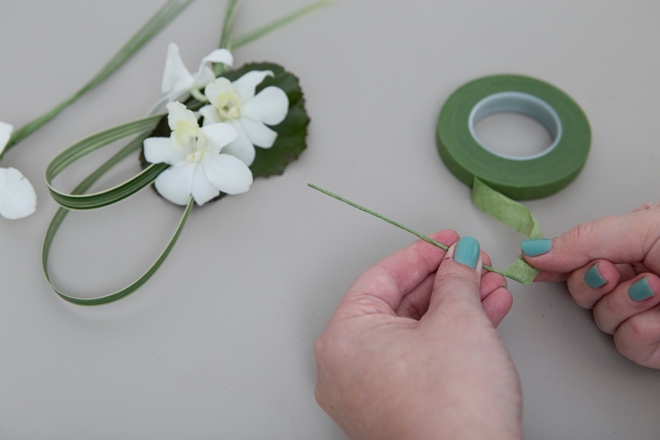
Wire wrapping. Wrap about 4″ of wire with floral tape to create a little twist tie of sorts.
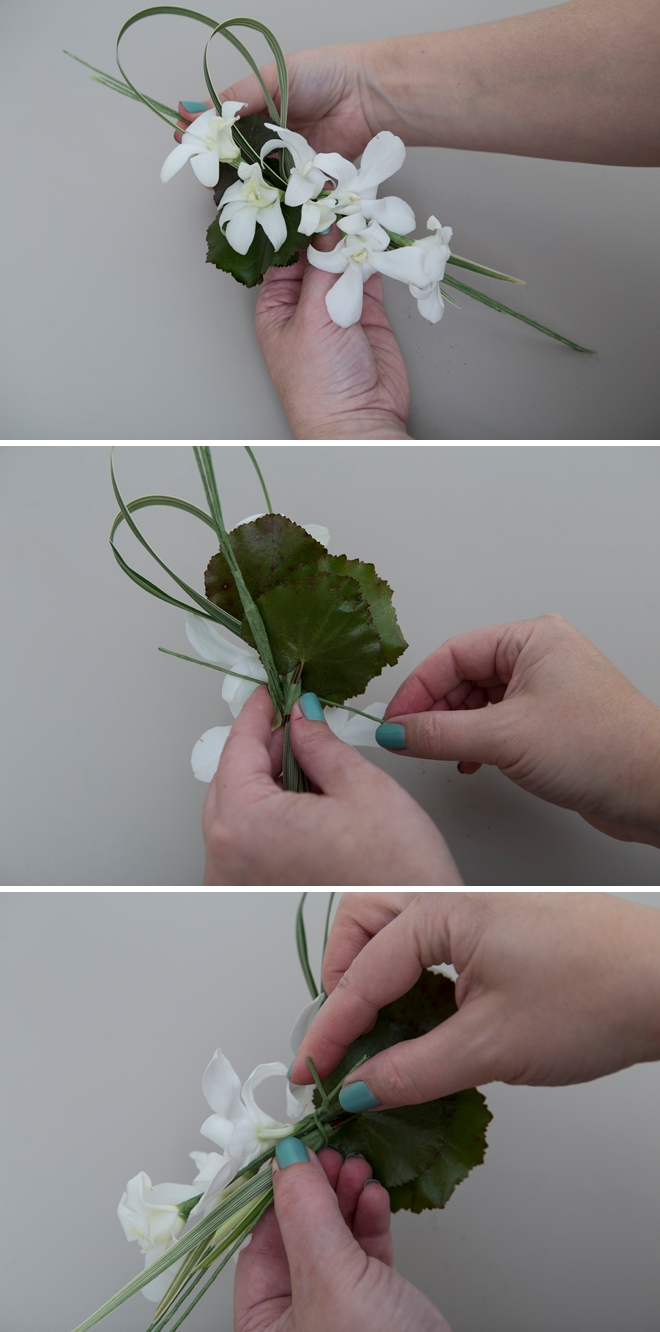
Upside down addition. Take the 3 orchids you just wired and add them, upside-down, through the backside of the corsage. Pull them up to meet the other orchid petals. Now you will have 3 wired stems at the top of the corsage and 3 at the bottom. Then using your “twist tie”, add it through the front side of the corsage and wrap/twist to secure all the pieces together. Isn’t that an awesome trick!?
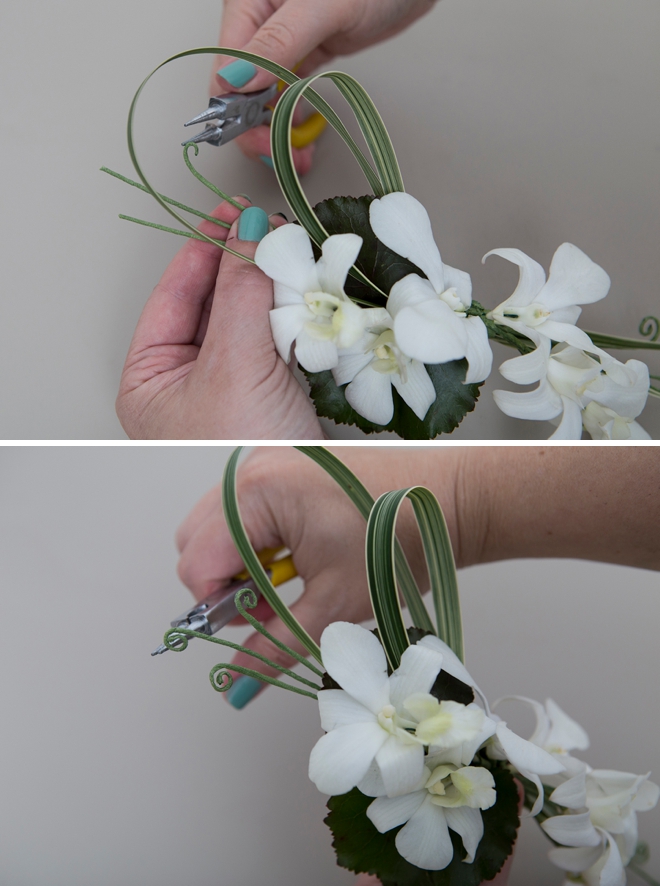
Curled details. To finish off the wired ends, use round nose pliers to create little wrapped curly details!
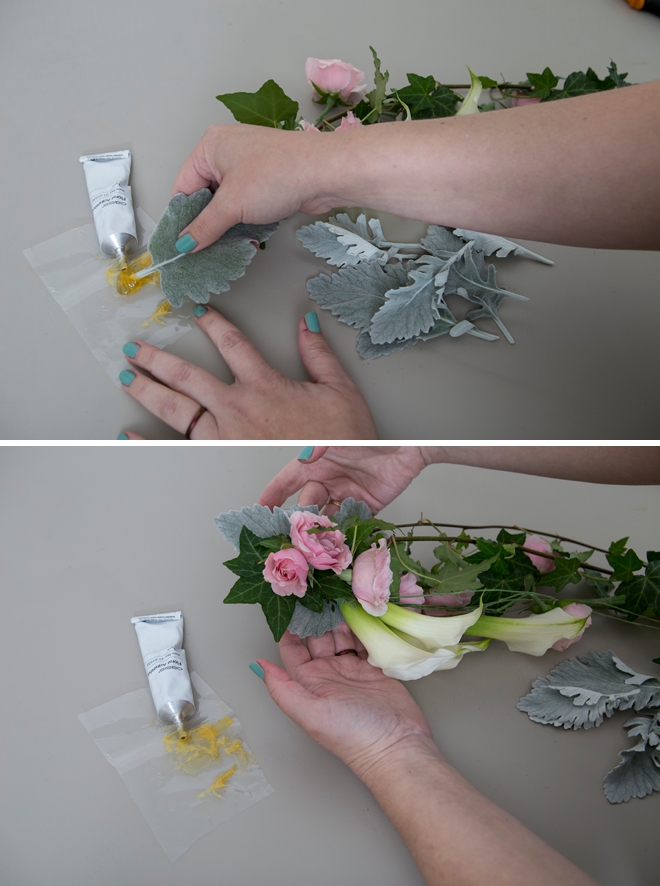
Floral Adhesive
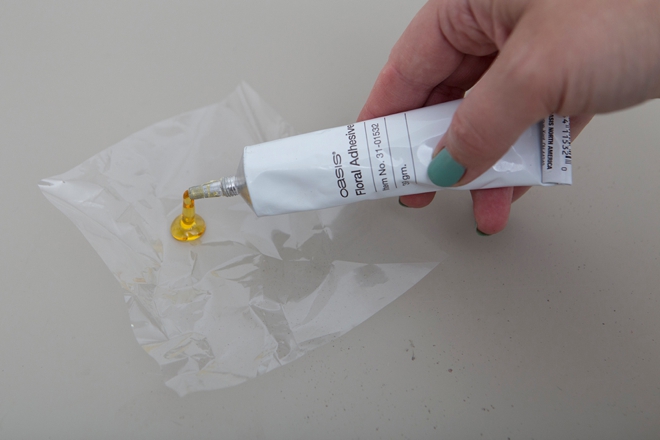
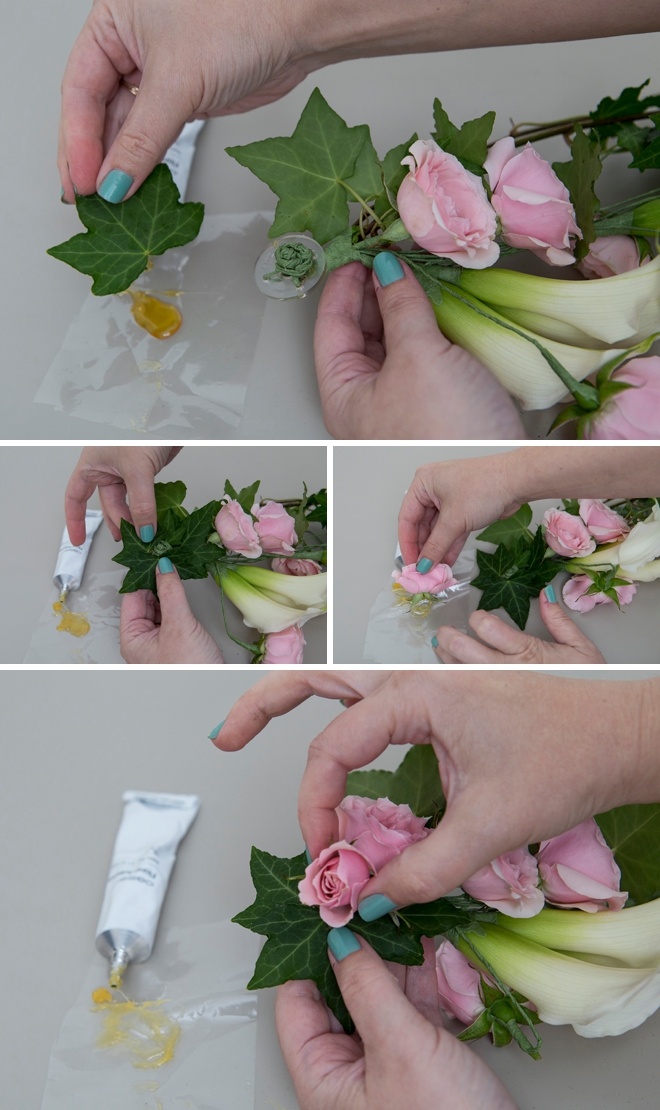
This stuff is the BEST. Before working with Jacki I had no idea it existed and now I always keep some on hand for flower projects. The trick with this is that you need to squirt some out on plastic to be able to dip your flowers into it. The easiest plastic to use is what the flowers come wrapped in, cut some off and squirt some out. It dries quickly so only use a little at a time.
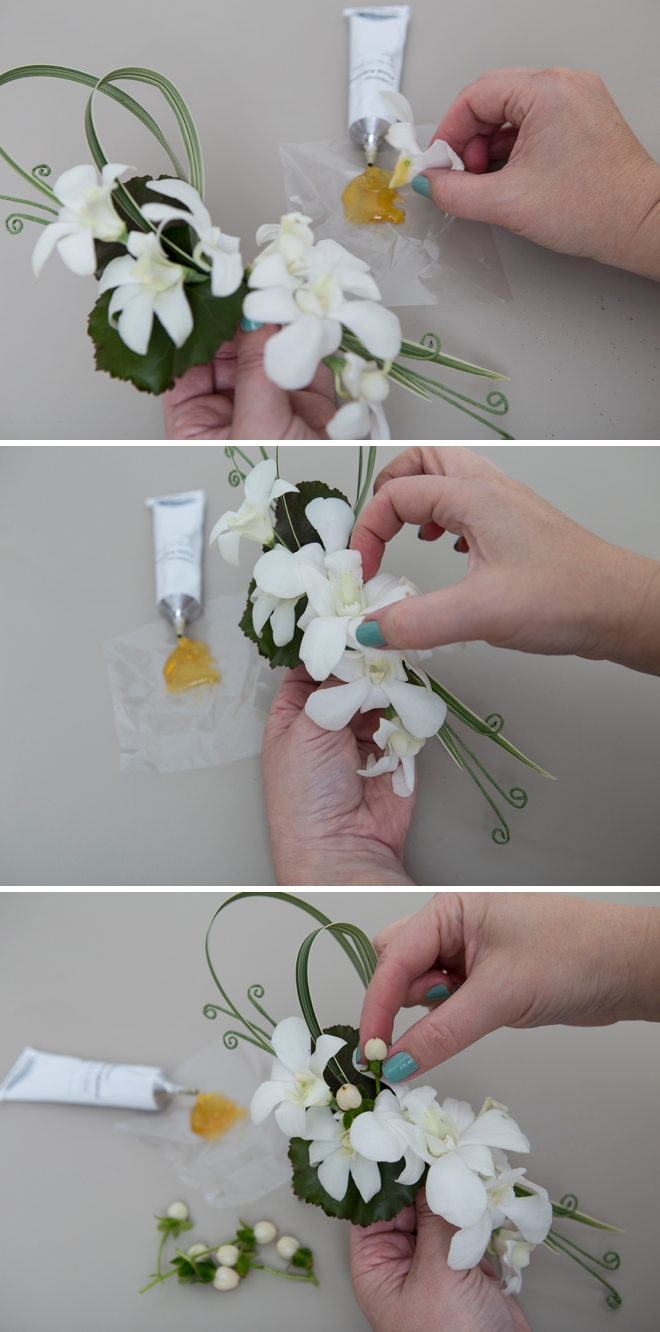
Finishing touches. The finishing touch for this shoulder corsage is to glue orchid petals and hypericum berries all around to create fullness, and hide some of the floral tape and magnets. Dip the elements in the glue and add where you see fit.
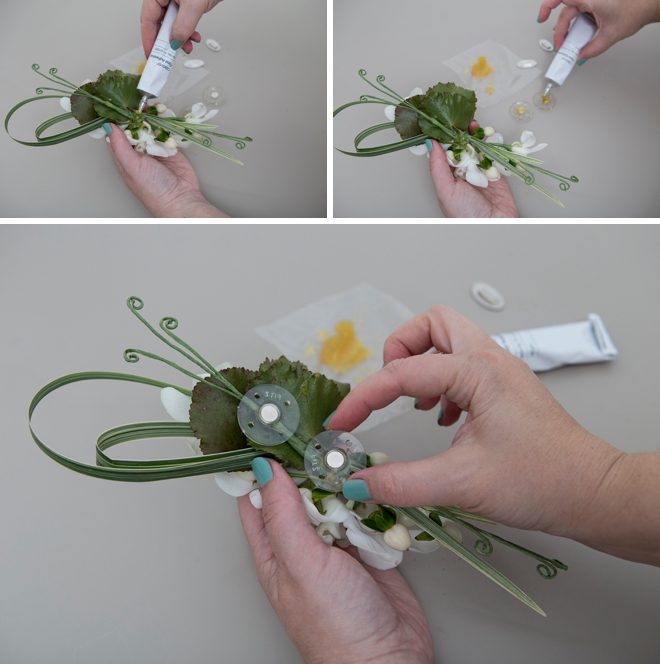
Gluing the magnets. The last step is to glue 2 magnets to the backside of the corsage. This way you don’t have to pin the corsage to your dress! This glue is like rubber cement, so add a little to the magnets and a little to the backside of the corsage and then attach. Let fully dry before trying out the magnets or wearing.
This beautiful shoulder detail could be a terrific option for your bridesmaids, the mothers and grandmothers (a different take on wrist or lapel corsages) or would even be a terrific addition to the brides look for the reception!
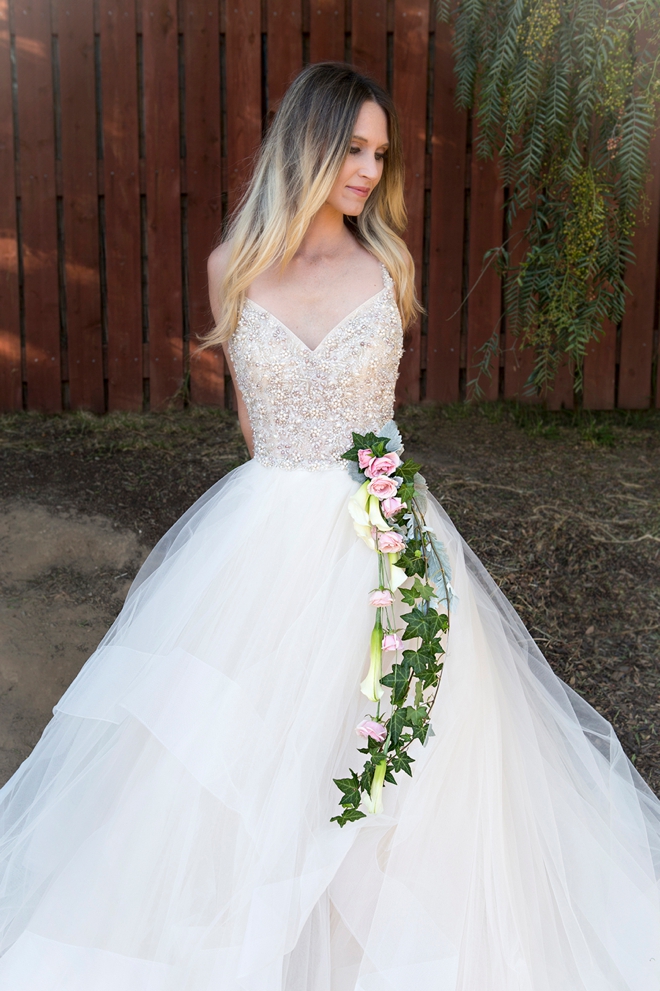
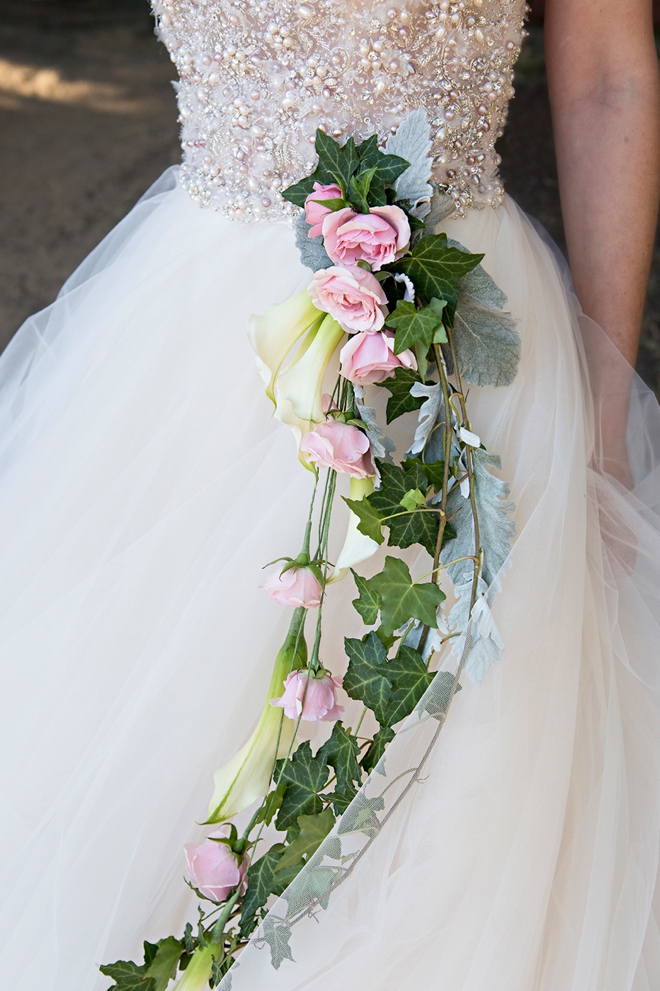
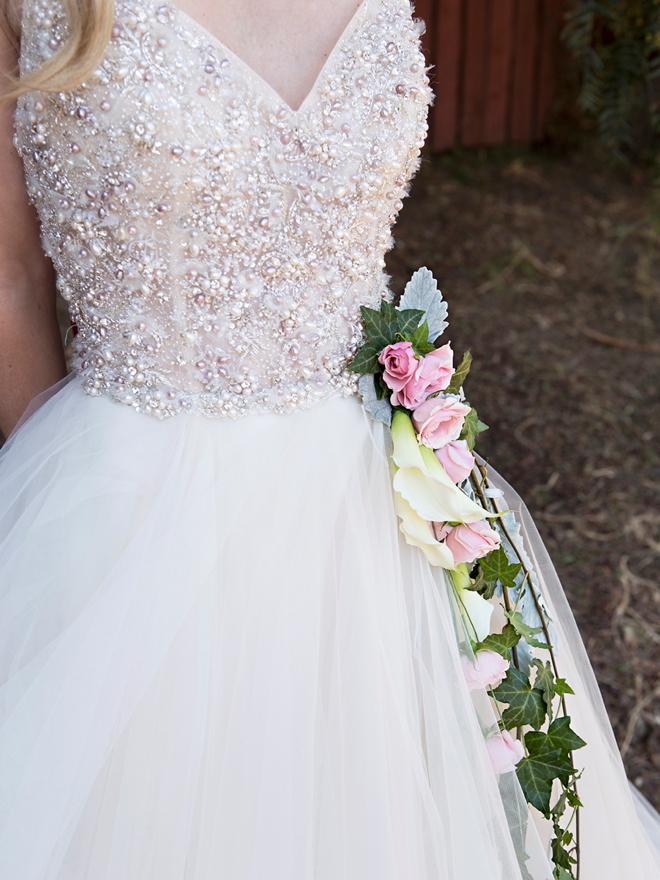
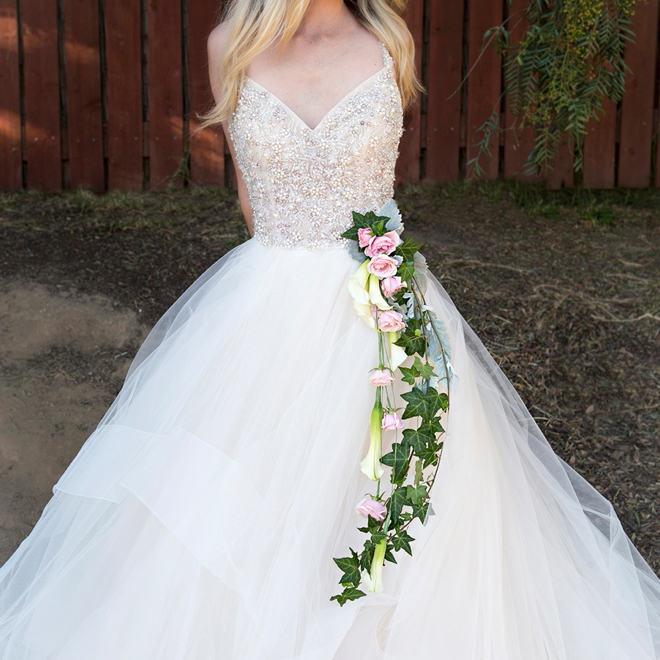
The Cascading Hip Corsage
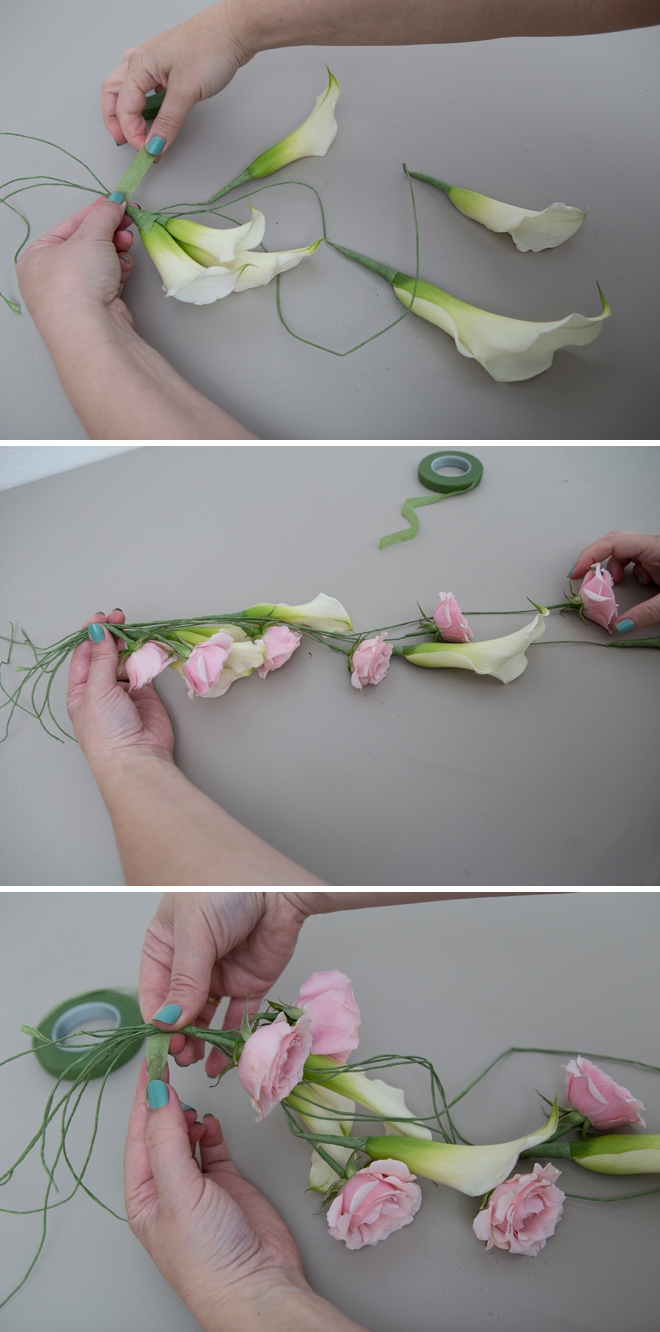
Air Taping. This is such a cool technique to learn! Start by adding a diagonal cut to a Mini Calla Lily like shown here.
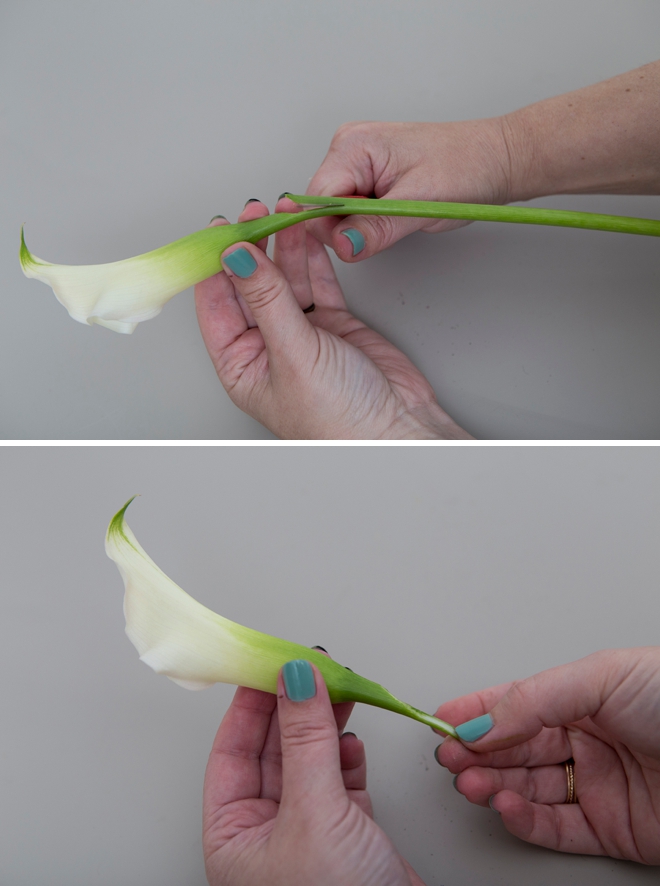
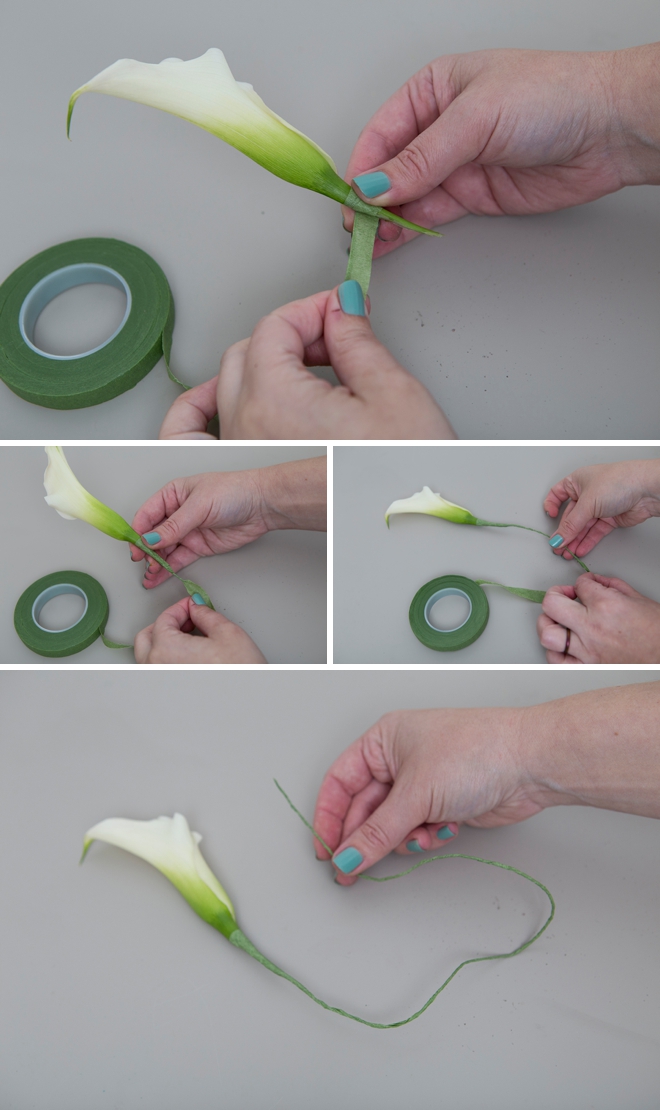
Pull the floral tape to make it sticky and then start wrapping from the base of the flower. Continue to wrap and roll the tape just like you would around a wire – except there is no wire. Make a long tape string to add movement to your flower within the corsage. Make 5-6 of varying lengths.
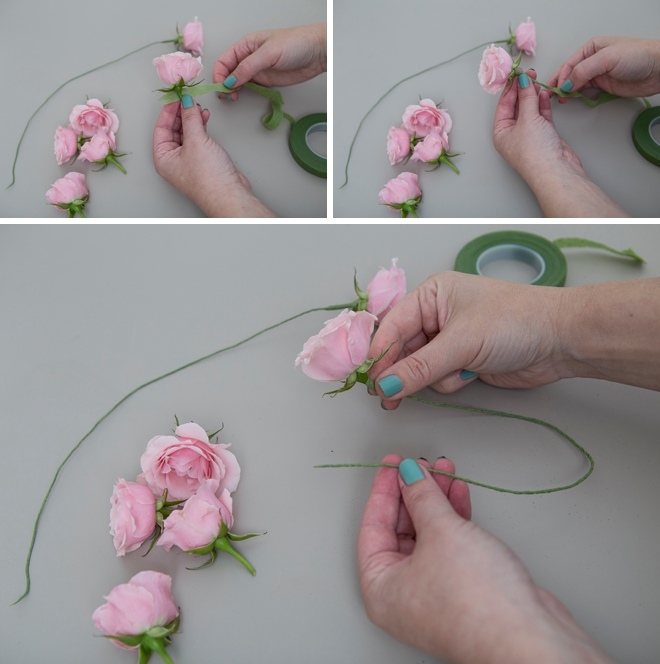
Same thing for the Spray Roses. Trim the stems leaving about an inch and wrap and roll to make a long tape string. Make 5-6 of varying lengths.
Assembly. Arrange your air taped Spray Roses and Mini Calla Lilies in a cascading shape and tape them all together at the top.
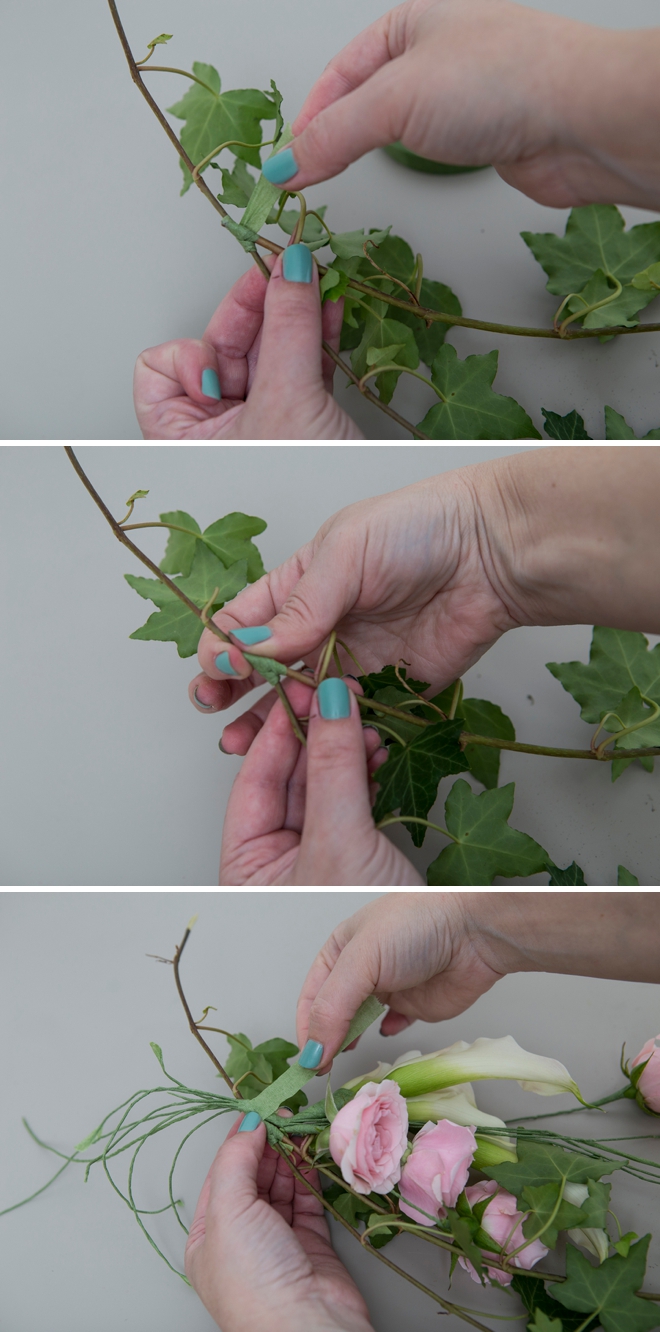
First tape together 2-3 pieces of Cascading Ivy and then add to your air taped flower bunch creating a large cascading design.
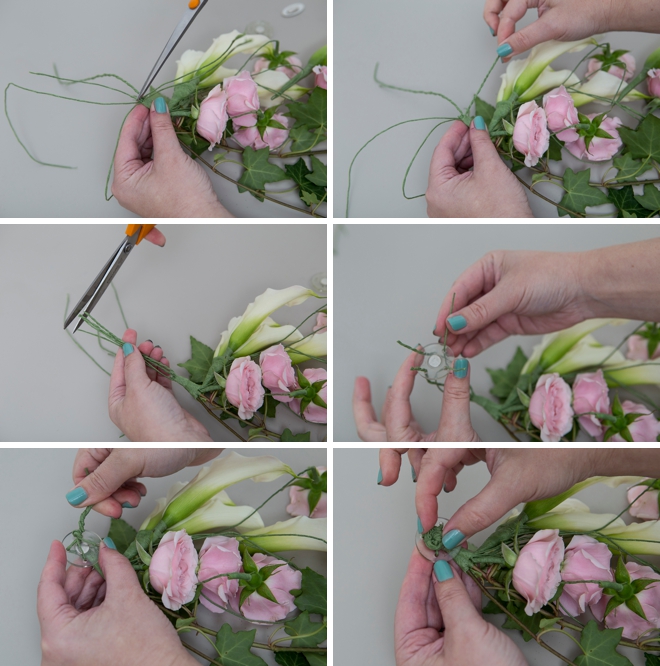
Affix To A Magnet. Now combine tape ends together by twisting to create 4 total. Cut any extra branches. There are 4 holes in the magnet so thread the 4 tape ends through the magnet and twist all together. Spiral wrap them together and roll into a circle behind the magnet, making sure it’s not on the magnetic side!
We had to add one more magnet right below this one with glue to sustain the weight of the corsage. You might need to add 1-2 more magnets depending on the weight of your arrangement.
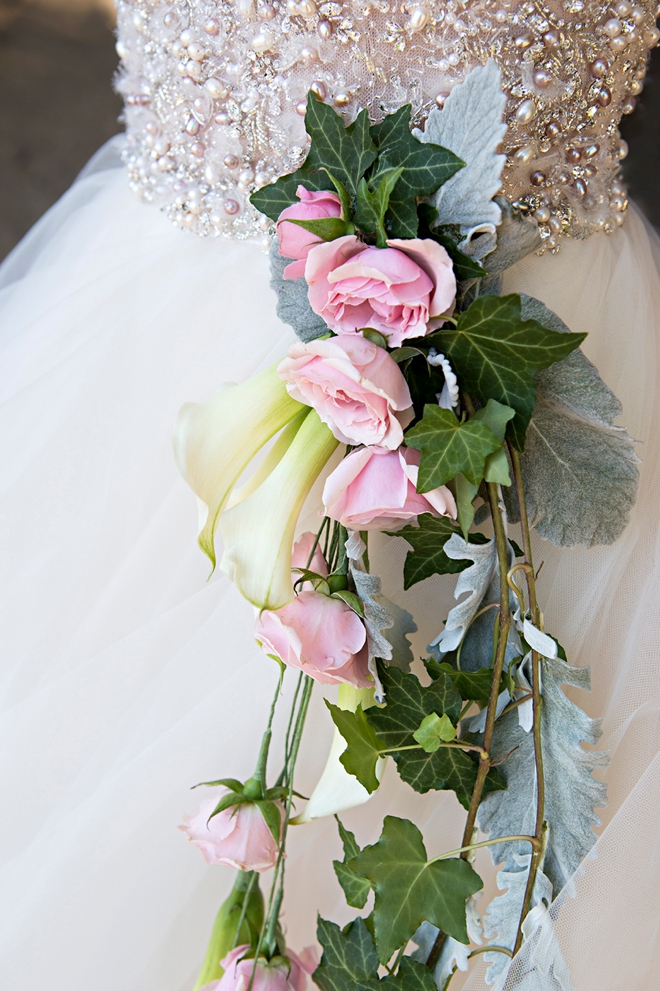
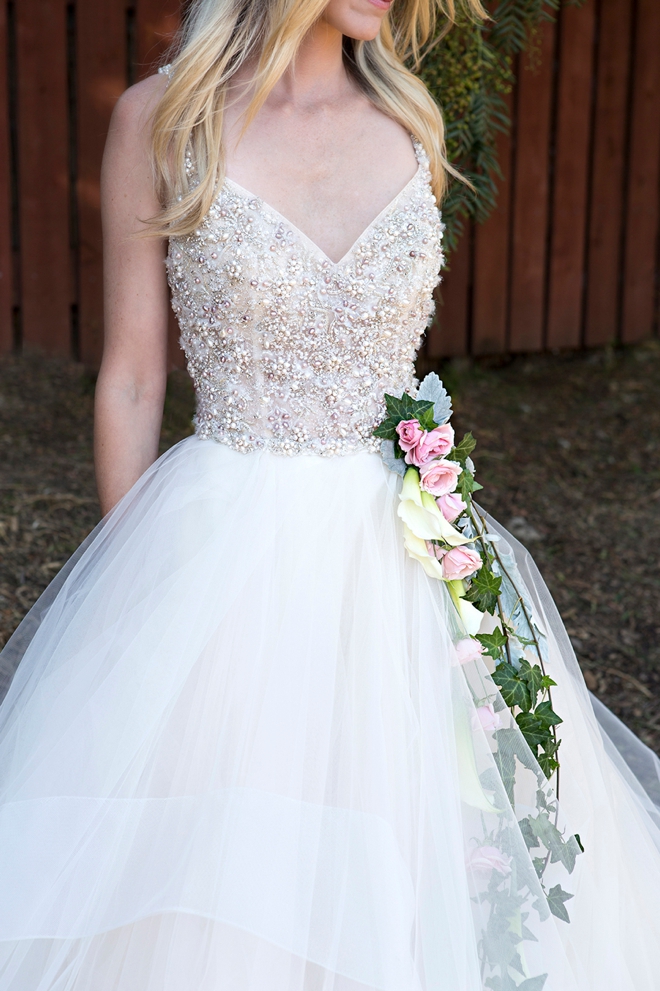
Finishing Details. To finish off the look of this corsage, grab your trusty Floral Adhesive and start adding more leaves and flowers. Glue leaves of Ivy, Spray Rose heads and Dusty Miller leaves anywhere you’d like. Make sure to cover the taped area and the magnet(s) aka. “the mechanics” of the corsage. Aim for the most flowers at the top, cascading off to just one leaf.
This design would make a stunning bouquet replacement for the bride and even her bridesmaids! Beware, Mom might want one too! For this look the magnets were placed right under the second layer of tulle on the dress, not all the way inside it.
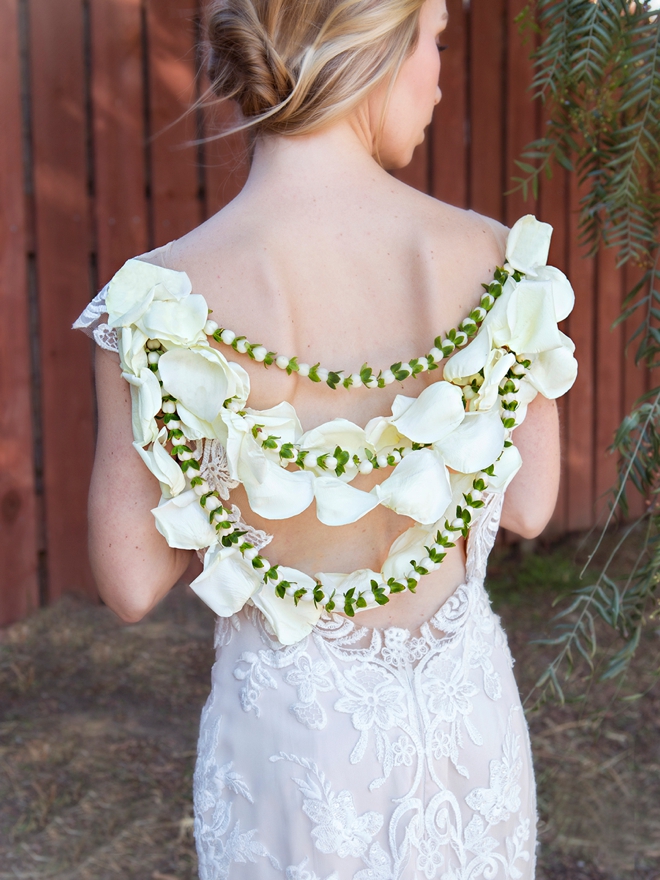
The Back Lei
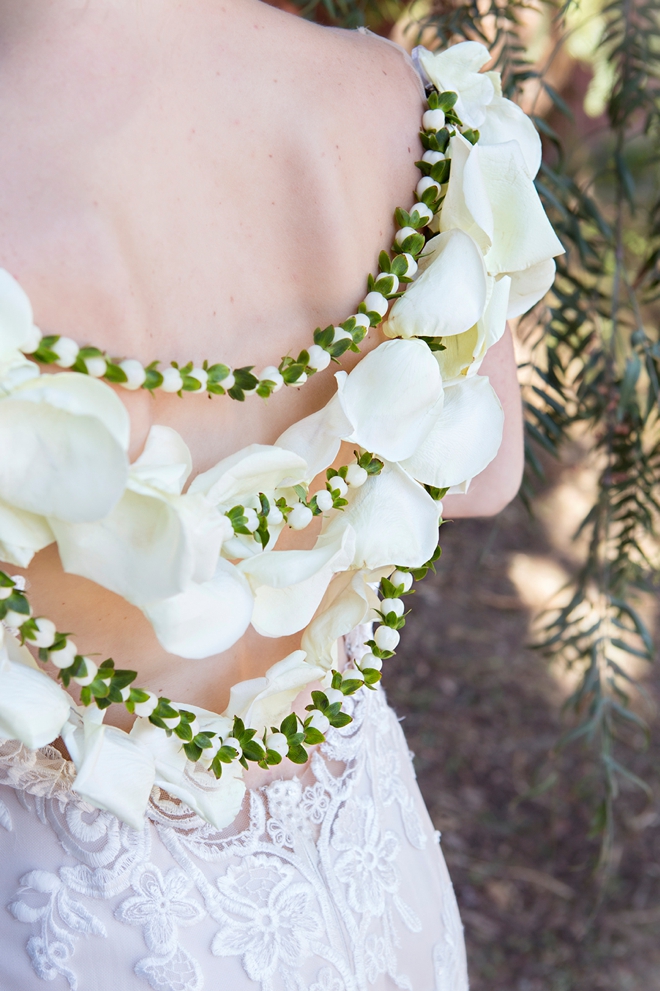
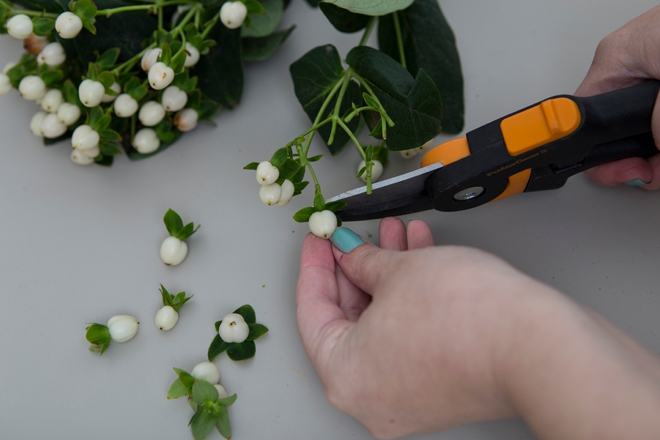
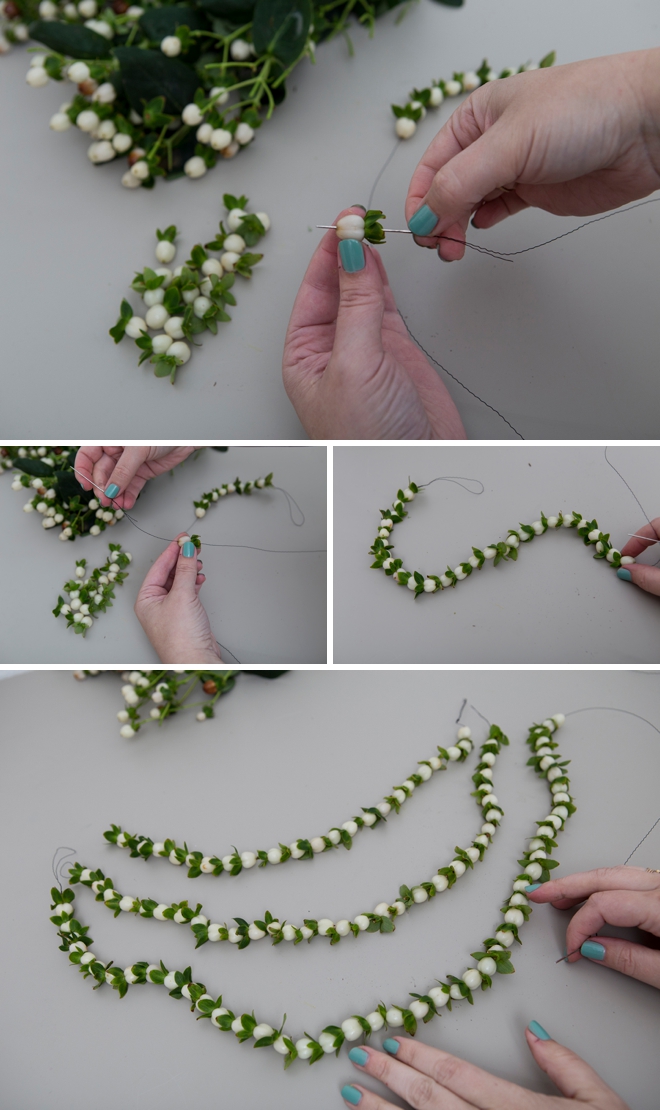
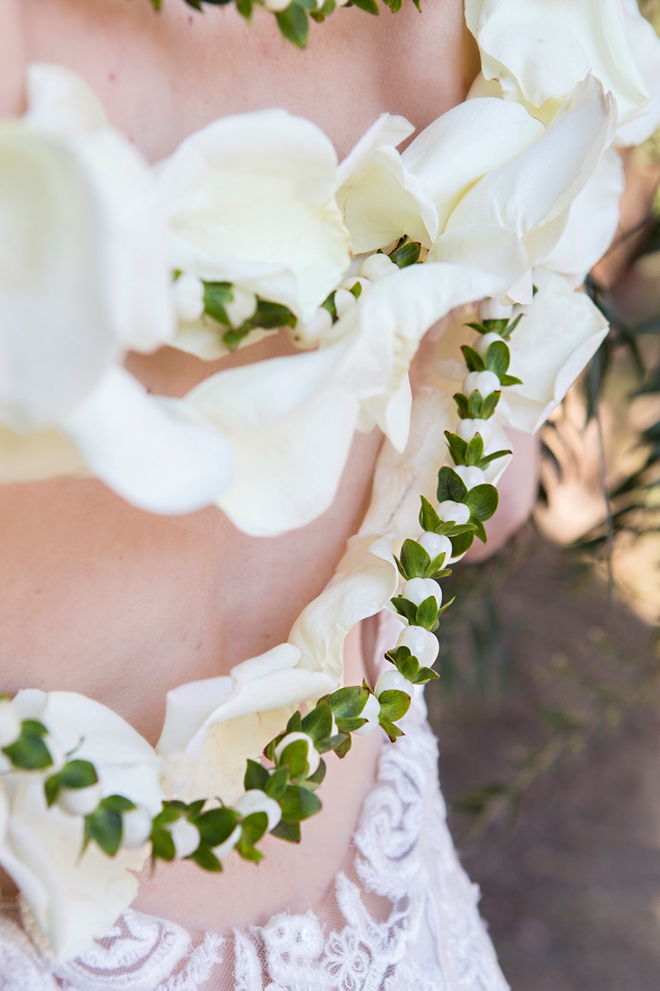
My absolute favorite. Not only was this one super easy to make but with all the Hypericum Berries it smelled heavenly! Start by cutting lots and lots of Hypericum Berries off their stems.
Stringing. Using Bullion Wire, cut three strands, each about 5″ longer than the first. Measure your back to see how long you’d like the first lei to be. Make a loop on one end by wrapping it together and thread the other end on an embroidery needle.
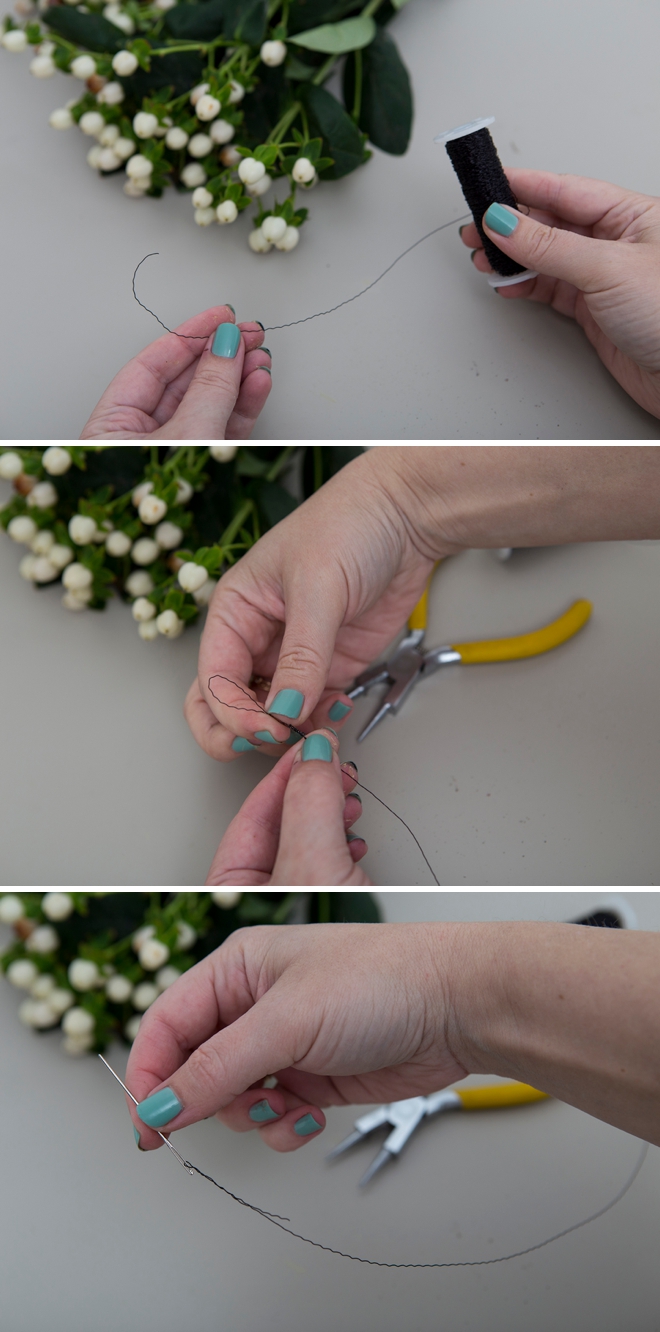
Then simply thread berry after berry onto the wire until each one is full. Going straight through the stem and out through the tip of the berry. This could also be amazing using different colors of berries!
I will be making Hypericum Berry garlands for the holidays for sure!
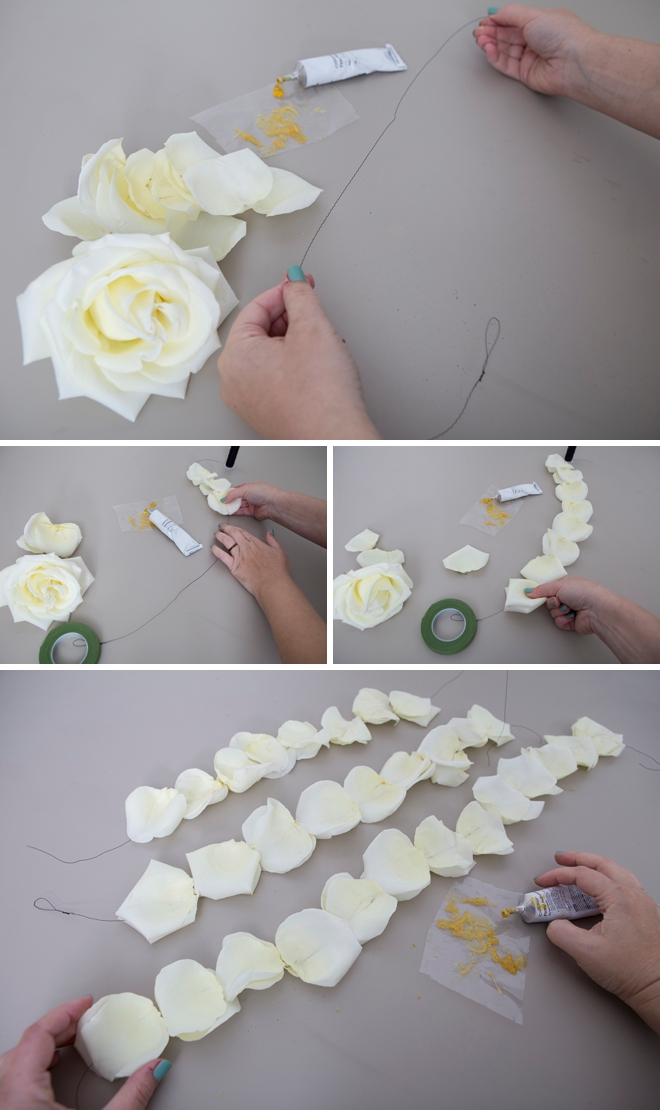
Flower Petal Garland. Wow, I would have never thought of this. Do the same thing to ready your wire except no need for the needle this time. Simply glue two large rose petals on either side of the wire. It can take a minute for the glue to dry so hold the petals gently together around the wire until they’re fully attached. It can help to use tape or something heavy to hold the ends of the wire down while working. Make a strand to mimic each Hypericum Berry strand.
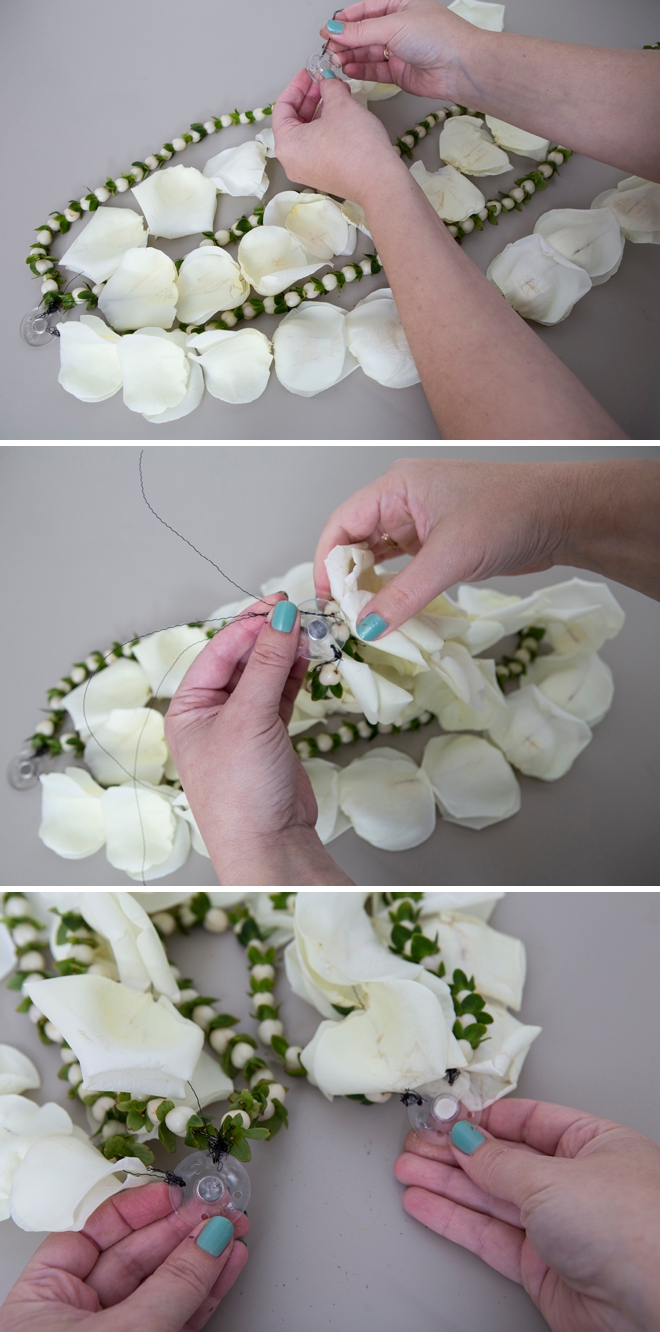
Attach. Layout all six garland strands and combine their wire ends together. Make sure you are happy with how they hang before you attach them all. Then tread the wire into the magnet holes. Glue one rose petal on top of each magnet to cover.
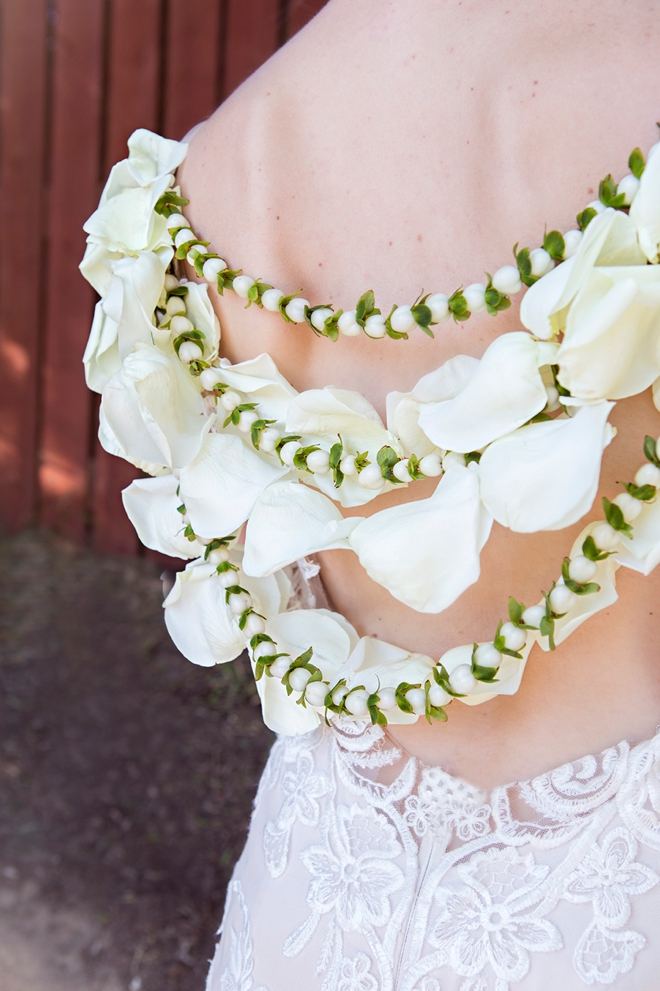
This design feels ultra tropical even though the flowers aren’t tropical flowers. The perfect detail for any type of beach wedding, especially if the brides dress is backless!
Casablanca Bridal
HUGE thanks to Casablanca Bridal for sharing these gorgeous dresses with us, the Karlee #2382, Elena #2392, and Elise #2384. We could make all the pretty wearable flowers in the world but if we didn’t have something pretty to attach them to, it wouldn’t be the same!
Also, thanks to my friends Jaymie, Liz, and Katherine for being such pretty models!
DIY Tutorial Sponsored By:

FiftyFlowers is the customer-centric, online destination for wholesale wedding flowers, shipped fresh from the farm straight to your door! Inspired by the DIY bride, we offer an extensive selection of fresh flowers, greenery, and floral accessories because we believe anyone can create their own wedding flowers.
As with all our DIY tutorials, if you create one of our projects please send us a picture – We Love Seeing Your Creativity! If you use Instagram or Twitter please use the hashtag #SomethingTurquoiseDIY and it will show up on our Get Social page. Happy Crafting!
DIY Tutorial Credits
Photography + DIY Tutorial: Jen Causey of Something Turquoise // All Flowers: courtesy of FiftyFlowers.com // Floral Tape and Wire: FiftyFlowers.com // Magnetic Floral Pins: Amazon // Fiskars Pruner: Amazon // Wedding Dresses (Karlee #2382, Elena #2392, Elise #2384): courtesy of Casablanca Bridal // Nail Polish: OPI – Withstands the Test of Thyme
Shop The Supplies:
Find the supplies you’ll need for this project from our affiliate links below:


Comments